Tuesday, June 28, 2011

Steamed Semolina and Carrot Cake

This is the time of the year when I pack my bags and anxiously count the days to go to India and meet my family.  Though I visit India every year but still each time its the same experience...nostalgic. And it's the same for them also...my parents, brother and my in- laws all anxiously wait for us to arrive and spend some days with their beloved grand child. My daughter will be spoilt with all the love, affection and how to forget..so many gifts as well. After coming back it becomes a great task for me to arrange her cupboard with the goodies she gets from her thathas, paatis and maama.

And before going  I have to do multitude of tasks...shopping, packing and cleaning my pantry, cupboards etc, and again I am finding myself short of time. I am also not able to feed my blog baby regularly and the cooking is also minimal in my kitchen, just using up what all is left in my pantry and still trying to eat healthy.

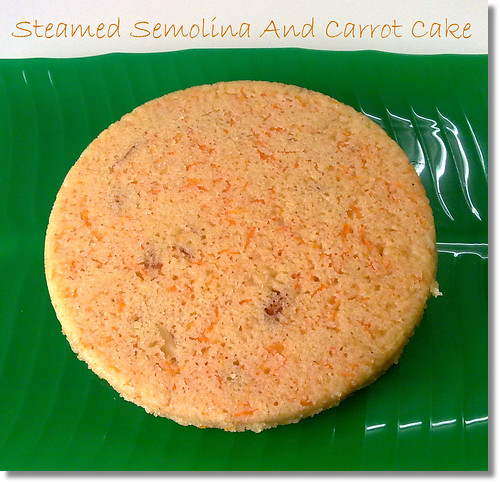
I had some semolina left and I was looking for some different way to use it up...just a bit fed up of eating upma....have to say~sorry dear upma but I need a change. I came across this recipe in Anjali's blog and was instantly hooked on it. I made very few changes to the original recipe and within 30 minutes I had  delicious slices of healthy and sweet steamed semolina and carrot cake...absolutely ~ guilt free.


Ingredients:

Semolina- 1/2 Cup
Carrot - 1 medium ( Grated)
Yoghurt- 1/2 Cup
Milk- 2 Tbsp
Sugar- 1/3 Cup or little more
Baking Powder- 1/2 Tsp
Cardamom Powder- 1/2 Tsp
Almonds- Chopped 7-8
Ghee- 1 Tsp to grease the dish

Procedure:
  • Grease a round dish with 1 tsp ghee to steam the cake and keep aside.
  • Dry roast semolina in low heat till slight golden brown in colour. Set aside to cool.
  • In another big bowl combine all the ingredients and whisk till the sugar dissolves.
  • Transfer the batter to the greased dish and steam on high in a pressure cooker ( without the whistle) for 20-25 minutes or till a toothpick inserted in the centre of the cake comes out clean.
  • Once cool invert the cake onto a plate, and serve by cutting in slices.

Linking this to Ayeesha's Any One Can Cook Series- 23
Priya and Aipi's Every Tuesday- Bookmark event


Thursday, June 23, 2011

Grilled Sprouts Sandwich

Sprouts feature regularly in my breakfast now a days, I usually eat the sprouts raw but these sandwiches have become my favourite. Even my fussy kiddo likes to have this sandwich, so in the end I am a happy mom as I can disguise the sprouts in her favourite sandwich. I was so glad to see her lunchbox fully polished off :)


Ingredients:

Whole Wheat Large Bread Slices- 4
Potato- 1 medium (boiled and mashed)
Onion- 1 small chopped finely
Moong Sprouts- 1/2 Cup
Tomato- 2 tbsp chopped finely
Salt, Chaat Masala, Black Pepper Powder- To Taste
Cheese Grated- Optional
Ghee or Butter Softened - To Spread ( Optional)


Procedure:

Mix potato, onions, sprouts, salt, chaat masala and black pepper powder together and keep aside. Apply ghee or butter on one side of a bread slice and keep the buttered side facing down on the grill or sandwich maker. Apply a thin layer of green chutney on the unbuttered side, spread the potato and sprout mixture above the chutney layer. Now place the chopped tomatoes on top of the mixture. At this stage grated cheese can be sprinkled on top. Close the sandwich with another bread slice and apply butter on the side of the bread facing up. Grill till done. Serve with tomato ketchup.

   ( The little one anxiously waiting to eat her favourite sandwich)

Sending this sandwich to Srivalli's Sandwich Mela
MLLA#36 brainchild of Susan and hosted at Served With Love
Also sending this to Quick and Easy Recipe Mela at Spicy Tasty


Pictures1-2


Monday, June 20, 2011

Thandai Icecream

The sun is shining too bright outside and all I want is to be confined in the comforts of my home with my AC doing overtime and running almost 24 hrs a day...and I am just wondering how much my electric bill will be this month...so Mr H if the bill is too high then just understand that its not me but its the sun which has forced me to forget about the AC running.

The idea of making this ice cream turned in my mind when I saw my thandai masala sitting in my refrigerator, so if you want a twist in your ice cream this recipe would be just perfect. The thandai masala infuses wonderful taste of spices in this ice cream and can make the guests wonder about the ingredients in it.


Ingredients:

Ground Thandai Masala- 1 tbsp
Badam Milk Powder- 2 tsp( optional- I used MTR)
Whole Milk- 2 1/2 Cups + 1/2 Cup
Cornflour- 3 tsp
Sugar- 1/4 Cup
Condensed Milk- 1/2 Cup
Cream- 1/4 Cup

Procedure:
  • Keep the 2 1/2 Cup milk for boiling, and while the milk is boiling mix in the cornflour with other 1/2 cup of cold milk and keep aside.
  • When the milk comes to boil add in the sugar and condensed milk. Now add the cornflour milk and keep on stirring for some time. The milk will start to thicken.
  •  Once the milk is little thick add in the thandai masala and badam milk powder. Stir so that everything mixes nicely without any lumps.
  • Switch off the gas and now add in the nicely beaten cream and mix. Let the mix cool at room temperature.
  • Once the mixture is cool strain it using a strainer- this is optional.
  • Keep the mixture in a closed container in the freezer.
  • Then follow the steps here to make the ice cream without the ice cream maker.


I garnished the ice cream with some tutti frutti and dried rose petals.

Sending this to Serve it- Chilled event by Denny at Oh Tate N See and to Pari's 'Only'- Icecream event hosted by Reva at Kaarasaaram

Wednesday, June 15, 2011

Khara Biscuits For Indian Cooking Challenge

It's not very long since I started baking but each time I bake something I enjoy the experience thoroughly. Kneading, rolling, shaping gives me lots of relaxation. And the joy of seeing the perfectly baked goodies out of the oven is priceless for me. I had not baked anything since last month..you know..trying to loose weight before my vacations... but still each time I saw any baked goodies in my fav blogs I was so tempted to bake..I only know how much will power it required to stop myself from baking anything sinful.

And while I was trying not to indulge in baking anything Srivalli announced the Indian Cooking Challenge for this month...I have to confess..I got so happy when I saw the challenge...baking...wow..that too savoury biscuits. Since I had missed last months challenge I was determined not to miss this months. The challenge was to make Karnataka special..Iyengar bakery khara biscuits...recipe to be referred was that of Champa's. And champa does not require any introduction. Her baking recipes are always fool proof...so I had even more reasons to be happy...yippee...these biscuits does not require loads of butter and moreover these are savoury ones....these are really so addictive and vanished in no time.

I did very few changes in the original recipe. Added sesame seeds and ground ginger, green chillies and coriander instead of chopping them. I have convection oven so I baked these at 180 degrees.


Ingredients:

All Purpose Flour- 250 gms
Butter- 1/3 Cup
Sugar- 4 tsp
Salt- 1 tsp
Green Chillies- 5
Coriander Leaves- 3 tbsp
Ginger- 1 Inch Piece
White Sesame- 1 tbsp
Yoghurt- 3 tbsp

Procedure:
  • Preheat the oven to 180 Degrees C.
  • Line the baking sheets with slightly greased aluminium foil and set aside.
  • Grind coriander, chillies and ginger together and keep it aside.
  • Sift flour and salt together and keep aside.
  • With the help of beater cream butter and sugar till smooth and creamy. 
  • Now in the creamed butter and sugar mixture add in the flour and salt mix along with ground green paste and sesame. 
  • Make a dough using yoghurt...add little by little and make a stiff dough. Don't over knead the dough. The dough should not be very wet.
  • Roll out the dough in 1/4 inch thickness and with the help of desired cookie cutter cut into shapes.
  • Bake in the pre heated oven for around 23 minutes.
  • The biscuits will be soft when done but will firm up on cooling.
  • When cool transfer these biscuits in an air tight container. 
Enjoy these with a cup of hot tea.

Monday, June 13, 2011

Badi / Vadi Ki Subzi

Sometimes when I am short of dinner ideas I like to make this badi subzi, this subzi is quick to make and tastes very delicious. Badi is made using daals like moong, urad, chawli. The daal are soaked overnight and ground using heeng, salt and chillies, then small marbled sized amount of batter is dropped and dried in the sun. The dried badis can be stored in an air tight container and used as and when required. To know more about how badis can be made please check here.

I have used store bought chawli badis. I prepare all the different kinds of badi subzis the same way.


Ingredients:

Dried badis- 100 gms
Potato- 1 ( Cut in big chunks)
Onion- 1 Large ( Chopped Finely)
Ginger- 1 Inch Piece( Chopped)
Garlic- 2 Cloves( Minced)
Tomatoes- 2 Big (Ground)
Mustard Seeds- 1 tsp
Cumin Seeds- 1 tsp
Turmeric Powder- 1/4 tsp
Salt, Red Chilli Powder, Coriander Powder, Amchoor- To Taste
Oil- 2 tbsp + more to fry the badis
Coriander Leaves- To garnish

Procedure:
  • Heat the oil in a kadhai and fry the badis till they turn brown in colour. Take out and keep separate.
  • In a small pressure cooker pour the 2 tbsp of oil and add mustard and cumin. When they start spluttering add in the ginger, garlic and chopped onions.
  • Fry till the onions turns translucent. Add in tomato paste along with all the spices and fry till the raw aroma disappears. 
  • Add in the potatoes, fried badis and stir. Pour in around 2-3 cups of water and mix everything. Close the lid of the cooker and cook in medium flame till 3-4 whistles come up.
  • Switch off the gas and when the pressure of the cooker drops down open the lid and garnish with chopped coriander.
Serve hot with phulkas.

Update: Vadis are also known as mangodis in Rajasthan and is a speciality dish there. Thanks to Sonu for pointing this out. I am sending this to her event Flavours of Rajasthan originally started by Nayna.


Tuesday, June 7, 2011

Sabz Bagh

Oh...how much I wish each minute had 120 seconds..so that I can claim 48 hrs each day. So many things to do and so less time at disposal. I really salute those super powered ladies who manage both office and their house efficiently...and not to forget ..how they manage more than 1 child. I really wonder if I could ever be that much efficient. I am always short of time no matter how fast I complete my chores.

I have not been able to visit my friends blogs as much as I would love to visit them. So all my dear friends I hope I would be able to catch up with your enthusiastic posts soon.

Sharing today an extremely healthy medley of veggies baked in orange juice. This is a very simple recipe and all the required veggies can be added. Saw this recipe long time back in Sanjeev Kapoor's show, but had not exactly noted the ingredients. So here is my version of Sabz Bagh ( which when translated means garden of veggies)


Ingredients:

Orange Juice- 1 Cup ( Preferably fresh home squeezed)
Par Boiled Mixed Veggies Cut in Big Chunks- 2 to 2 1/2 Cups ( I used a mix of cauliflower, broccoli, beans, baby carrots, green peas and baby corns)
Tomato Ketchup- 2 tbsp
Salt and Red Chilli Powder- For Taste


Procedure:

  • Heat a skillet and add orange juice. Once it gets little warm add in the par boiled vegetables.
  • Let the veggies cook in the orange juice for some time.
  • Meanwhile preheat the oven to 180 Degrees C.
  • Add in salt, tomato ketchup and red chilli powder.
  • Transfer the veggies along with remaining juice to a baking dish and bake in the pre heated oven for around 40 minutes.
Serve the veggies with hot rotis or parathas.

Linking this to Priya and Aipi's Bookmarked Recipes- Every Tuesday Event.
Veggie/ Fruit A Month- Orange Event of Priya and hosted by Savitha

Sunday, June 5, 2011

Mango Vermicelli Halwa

With mango season in full bloom I am getting to see many wonderful mango related posts in the blogosphere. And how long could I have stayed away from making a mango based sweet. My daughter liked this a lot and I am sure I will be making this again for few more times till the mangoes keep arriving.


Ingredients:

Vermicelli- 1 Cup
Mango Pulp- 1/2 Cup( I used fresh Alphonso mango pulp)
Milk- 1 1/4 Cup
Granulated Sugar- 1/4 Cup- 1/3 Cup( depending on sweetness required)
Ghee- 3 tsp divided
Almonds- To Garnish

Procedure:
  • Heat a skillet/ kadhai and add 1 tsp of ghee. Add the vermicelli and roast till golden brown. Take out on a plate and keep aside.
  • In same kadhai add milk and keep for boiling. Once milk comes to boil add the roasted vermicelli and cook covered till vermicelli cooks completely.
  • Add the mango pulp and sugar and cook until sugar dissolves.
  • Add the remaining 2 tsp of ghee and cook for some more time.
  • Garnish with almonds. 
Serve hot.

Thursday, June 2, 2011

Gazpacho

Gazpacho is a cold Spanish tomato based soup which is ideal for summers due to its being cold and acidic in nature. And as I am trying to eat healthy I was browsing for some good soup recipe and came across Gazpacho...this soup perfectly suited us and it has lot of scope for variations. This soup is rich in Vitamin C, is  low in calories and trans fats.


Ingredients:

Bread( White or Brown)- 2-3 slices
Tomatoes- 4 Large quartered
Cucumber- 1sliced
Capsicum- 1 medium diced
Garlic- 2-3 cloves
Vinegar or lime juice- 2 tbsp
Olive Oil- 1 tsp
Salt- to taste

Procedure:
  • Soak the bread in little water and squeeze out the excess water.
  • Add all the ingredients in the blender along with soaked bread slices and process till every thing is ground.

  • Strain the soup and keep in the refrigerator. Serve chilled and garnish with bread cubes, chopped tomatoes and capsicum.
Variations: Tomatoes and bread can be replaced with either Avocados, watermelon, grapes. Onion can also be added and cucumber may be omitted.

ShareThis

Post From The Past

Related Posts Plugin for WordPress, Blogger...