Showing posts with label Snacks. Show all posts

Thursday, November 8, 2012

Cornflakes Namkeen ~ An easy snack made with dry conflakes

My blogger dashboard and Facebook timeline has been flooded with Diwali blog posts. Almost everybody is posting some delicious festive treats and I am loving all the festivities around. It has been long since I posted anything, after coming back from holidays I became lazy...the task of taking pictures, editing, writing blog post seemed very cumbersome to me. It's not that I had not been cooking but only cooked for eating and not for blogging. Some of my dear friends, my family members constantly reminded me to feed my blog but somehow I never came around doing it.

But better be late than never...so here I am with Cornflakes Namkeen or Mixture. I learned this recipe from my sister-in-law who is herself an expert cook. This namkeen tastes really yum, is very easy to make too....just requires frying time and being mildly spiced is hit with kids too.

The proportions I have mentioned are just approximate as this is a very versatile recipe. The choice of ingredients and the amount of each ingredient used is completely flexible, one can increase or decrease the number of ingredients depending on the availability and liking.


Ingredients:

Cornflakes Chivda ( Dry Cornflakes ) - 2 Cups
Saboodana Chivda ( Sago Flakes) - 1 Cup
Potato Flakes - 1/4 Cup 
Mota Poha ( Thick Beaten Rice ) - 1/2 Cup
Cashew nuts ( Whole ) - 1/4 Cup
Almonds ( Whole ) - 1/4 Cup
Peanuts - 1/2 Cup
Curry Leaves - 1/4 Cup packed
Salt , Sugar , Kashmiri Red Chilli Powder - To Taste
Oil - For Deep Frying

Procedure:

Heat oil in a deep pan. When the oil gets hot start frying each ingredient in the order I have listed. After frying take out the ingredient in a deep bowl, and add in salt, sugar and chilli powder. Do this when the fried items are still hot as the spices will better stick to them. 

Repeat this process with each ingredient. Fry it, take out and add in spices. Adding spices after frying each ingredient makes the flakes and other nuts well coated with the spices.

Cashwenuts should be fried till they turn golden brown and almonds should turn deep brown in colour. Peanuts should be fried till they start cracking and turn deep brown in colour. Add spices to these as well.

In another small pan add in a tablespoon of oil and fry the curry leaves till they turn crisp.

Mix together all the fried items together and check for seasoning again. If required add in more spices. We prefer our namkeen mildly spiced. 

Please refer to the notes below as well.


Notes:
  1. Before frying make sure that the oil is hot else the flakes will not puff nicely. Check if the oil is hot by putting 1 or 2 flakes first. If they puff up nicely then oil is ready.
  2. Always fry in small batches to ensure uniform frying.
  3. Fry the ingredients in the order listed in the ingredient list as cornflakes and sago absorb less oil while beaten rice absorbs more oil.
  4. Peanuts should be fried at last or in a separate pan with some oil as the oil tend to get brown once peanuts are fried.
For some more Diwali treats check out these posts as well-


Sunday, January 22, 2012

Sweet Cinnamon Roasted Chickpeas

I am so much hooked to Pinterest these days, its a great place to pin and categorize all things which we like. There are great resources out there ranging from photography to yum recipes, and I am loving it. I came across this recipe in Pinterest which is from The Pastry Affair and I knew that this is one of the recipe which is easy to make, healthy and quite addictive. Apart from the baking time, this requires just a few minutes of assembling. 


Ingredients:

Chickpeas/ Garbanzo Beans- 2 Cups cooked or one 15 ounce can
Cinnamon Powder- 1 Teaspoon
Granulated Sugar- 1.5 Tablespoon
Canola Oil- 3 Teaspoons
Maple Syrup/ Honey- 1 Tablespoon
Procedure:

Preheat the oven to 190 Degrees C. Drain and rinse the chickpeas and keep aside. In a small bowl mix together oil, cinnamon and sugar. Now mix this paste with chickpeas so that beans is evenly coated. Spread the chickpeas on  baking sheet and bake for 45-50 minutes, shake the tray in between for one or two times. After 45 minutes check for the crispiness. If more crispiness is required then bake for few more minutes.

After the beans are baked take them out of the oven and pour maple syrup/ honey on it while it is still hot. Evenly coat the beans with the syrup and let dry for sometime. Store in an airtight container, but mine never made it to the container, the beans were devoured within the first hour of baking :)


Sending this to Priya's CWS event held at Saffron Streaks.
Also linking this to Priya Mahadevan's Fast Food Not Fat Food event hosted at Priya Sreeram's Bon Appetit.


Friday, January 6, 2012

Lauki Muthia / Bottle Gourd Steamed And Seasoned Cake


Bottle gourd is not a favourite vegetable of many but as it has got mild flavour, it can be disguised in many forms. One such form is muthia or steamed cake. This is a Gujarati dish which is very healthy and at the same time too delicious. My mother used to make this and this was the tastiest and healthiest recipe of bottle gourd.

My mother is very fond of gardening and she grows a number of veggies like sponge gourd, bottle gourd, okras, potatoes and even cauliflower in her kitchen garden. Bottle gourd used to grow in abundance and even after distributing some to curious neighbours we were left with plenty so much that we were almost forced to consume it every day in some form or the other. I have to admit that I was quite not happy with it at that time, but now after so many years when organic is the choice for healthy living and it being so heavily priced I miss my mummy's home grown organic bottle gourd. 


This time when I went to India for vacations I enjoyed eating home grown veggies and now appreciate its goodness. The below picture is from my mom's kitchen garden..look at the fresh bottle gourd and sponge gourd.


Ingredients:

For the Steamed Cake-

Bottle Gourd- 2 Cups grated
Gram Flour (Besan)- 1/2 Cup
Whole Wheat Flour- 1/2 Cup
Semolina- 2 Tbsps
Pearl Millet Flour (Bajra Aata)- 2 Tbsps
Corn Meal ( Makkai Aata)- 2 Tbsps
Rice Flour- 1 Tbsp
Ginger- 1 Inch Piece
Green Chillies- 2 or 3
Coriander Leaves- 2 Tbsp chopped
Turmeric Powder- 1/4 Tsp
Dry Mango Powder( Amchoor)- 1/4 Tsp or Juice of 1 lemon
Sugar- 2 Tsp
Soda- Bi- Carbonate- 1/4 Tsp
Oil- 1 Tbsp
Salt- To Taste

For Tempering-

Canola Oil- 2 Tbsp
Mustard Seeds- 1 Tsp
Cumin Seeds- 1 Tsp
Sesame- 2 Tsps
Curry Leaves- 10
Asafoetida- 2 Pinches
Lemon Juice- 1 Tsp

Coriander leaves- For Garnishing

Procedure-

  • Make a paste of ginger, green chillies and coriander leaves and keep aside.
  • Squeeze water from the bottle gourd and then add in all the flours, paste as made above and other ingredients as mentioned in the ingredients list for the steamed cake.
  • Mix everything together nicely so that a soft dough is formed. The dough will be little sticky, but if the dough is too sticky or wet then more gram flour can be added.
  • Keep the dough aside for 10-15 minutes.
  • Apply little oil in your hands and take out small portions of the dough and roll them into thick cylinder shapes. Similarly make all the cylinders. For this quantity you will get atleast 7 cylinders of about 1 1/2 inch thickness.
  • Place these cylinders in a steamer and steam them for about half an hour or till a toothpick inserted comes out clean.
  • Let the muthias cool for sometime and then cut them into round discs of about 1/2 inch thickness.
  • Prepare the tempering by adding oil in a wok and once oil gets hot add in asafoetida, mustard, cumin and once they splutter add in sesame and curry leaves. 
  • Now put in the muthias and fry them in medium flame for 4-5 minutes taking care not to over stir the muthias as they may break. Switch off the gas and garnish with coriander leaves.
  • Serve hot with coriander chutney.


I had some muthias left over after snacking. To know what I did with them stay tuned for my next post.

Sending this to my own event Veggie/Fruit A Month- Bottle Gourd which was started by Priya of Mharo Rajasthan.

Fast Food Not Fat Food Event of Priya Mahadevan hosted currently at my dear friend Priya Sreeram's space.

Walk through Memory Lane at Gayathri's space.

Vardhini's New U event.


Friday, December 23, 2011

Thekua ~ Indian Cookies For Indian Cooking Challenge

This month for the Indian Cooking Challenge, Srivalli challenged us to prepare traditional Indian cookies from the state of Bihar and these are called as Thekua or Khajur. These are crispy biscuits which are deep fried in oil and makes perfect tea time snack.

I had been too busy this month and am very late to post this but still happy that I am able to join in the gang at ICC.


Ingredients:

All Purpose Flour- 2 Cups
Semolina- 4 Tablespoons
Powdered Sugar- 8 Tablespoons
Grated Dry Coconut- 4 Teaspoons
Cardamom Powder- 1/8 Teaspoon
Oil/ Ghee- 8 Teaspoons + More for deep frying
Water- To make a dough

Procedure:

Mix flour, sugar, coconut, semolina and cardamom together and add in 8 teaspoons of oil. Using water bring everything together to form a crumbly dough. Meanwhile keep the oil to heat in a deep frying pan at medium heat.

 Roll out the dough to about 3-4 mm thickness, then using a cookie cutter cut out the shapes. Gather the trimmed edges and again repeat the rolling and cutting procedure till all the dough is used up.

Prick the cookies with a fork to prevent them from puffing. Deep fry these cookies in hot oil on medium heat till they turn golden brown in colour. Remove the cookies from oil and place them on kitchen paper to remove excess oil.

Once cool store these cookies in an airtight container, these stay good for about 2 weeks.


Thinner cookies are more crisper than the thick ones and next time I would increase the sugar little bit more as my family has got sweet tooth.


Thursday, December 8, 2011

Eggless Rosette Cookies

Christmas is around the corner and these Rosette cookies or Achappam as they call in Kerala ( Southern Indian State) are traditionally made around this festive time. To know more about their origin I took help of Wikipedia and it seems that these cookies originated in the Scandinavia.  


These cookies are made using special mould which is made of iron and has intricate design with wooden handle. The mould is dipped in hot oil and then immersed in the batter which is then fried to get these delicious treats.


I made these rossette for the first time and almost all the recipes call for eggs but since we don't take eggs I was little sceptical as how these would turn out, but these turned out super good and were a real treat.

Ingredients:

Fine Rice Flour- 3/4 Cup ( Make sure to use non roasted flour)
All Purpose Flour- 1/2 Cup
Sugar- 1/2 Cup
Banana Purée- 1 tbsp
Thick Coconut Milk- 1/2 Cup
Cardamom Powder- 1/2 Tsp
Black Sesame Seeds- 1 Tbsp
Water- To make the batter
Salt- A Pinch
Oil - To Deep Fry

Procedure:
  • Heat oil in a frying pan and keep the rosette mould immersed in hot oil.
  • Prepare the batter by mixing rice flour, all purpose flour, sugar, banana purée, coconut milk, cardamom powder, black sesame seeds, salt together and add water to make a smooth, lump free batter of neither too thin nor too thick but of flowing consistency.
  • When the oil is hot enough take out the mould from it and immediately immerse the mould upto 3/4th in the prepared batter. Take care not to fully immerse the mould in the batter else the cookies will not come out of the mould.
  • Take out the mould from the batter and immediately immerse it in the hot oil. 
  • Let the batter fry for 20-30 seconds in medium heat along with the mould.
  • Now gently tap the mould to release the cookie in the oil. If the cookie doesn't come out on it own then use a skewer to remove the cookie. However with practise these cookies come out perfectly.
  • Fry on both sides till the cookies turn slight golden. 
  • Make sure to fry only a couple of these at a time, since these turn dark very quickly.
  • Also the mould has to be hot each time before being dipped into the batter. If the mould is not hot then the batter won't come off in hot oil.


Linking these to #cookielove blog hop co hosted by me along with other wonderful bloggers. Do check them here.

Wednesday, November 30, 2011

Cookielove~ Savoury Cookies~ Mathri

This is the time for love blog hop and the theme for this month is cookie...so get ready for some cookielove. My family loves cookies and I always keep my cookie jar full, my DH and daughter have got sweet tooth and always prefer sweet cookies but I like to munch on savoury ones with my cup of tea. These spiced cookies are called Mathri in India and are generally deep fried. These cookies are very crunchy and flaky, the more the amount of fat used the more crunchy these will be.

Instead of deep frying I have baked these cookies and to make them vegan I have used canola oil instead of ghee (clarified butter).


I have used dried fenugreek leaves (Kasuri methi) to flavour these cookies.


Another spice which I have used is Black pepper..really adds a pep to these cookies. But these spices are optional and can be adjusted according to the tastebuds.


Ingredients

Whole Wheat Flour- 1 Cup
All Purpose Flour- 1/2 Cup
Gram Flour (Besan)- 1/2 Cup
Semolina- 2 tbsp
Turmeric Powder- A pinch
Raw Sugar- 1 tsp
Dried Fenugreek Leaves ( Kasuri Methi)- 1 tbsp
Black Pepper Powder- 1 tsp
Cumin Coarsely Crushed- 1/4 tsp
Salt- To Taste
Oil/ Clarified Butter- 1/2 Cup (hot)
Warm Water- 1/2 Cup to make the dough

Procedure:
  • Preheat the oven at 200 Degrees C.
  • In a large bowl mix together all the ingredients except oil and water. 
  • Add hot oil to the flour mix little by little and mix everything together with a spoon. 
  • Now add warm little by little and bring the dough together. Do not knead.
  • Now transfer the dough on a clean surface and roll with a rolling pin. The dough will not be sticky because of the presence of fat.
  • Roll the dough to the desired thickness and cut into round shapes with the help of cookie cutter.
  • Arrange in a baking tray and bake on the top rack for about 10 minutes, after 10 minutes turn over the cookies and let them bake for another 10 minutes. 
  • Keep a close eye on these as they brown very quickly.
  • Let the cookies cool  and store them in an airtight container. These cookies have shelf life of almost a week.


On another important note we celebrated UAE National Day on 2nd December. UAE turned 40 this year. This is a country which has provided good opportunities to many in all the fields along with being a safe and  multicultural nation.

And the kids celebrated the National Day in school with great joy and my daughter came back home singing "Let's salute the UAE on 2nd of December...."


And on this day I am celebrating my first blog anniversary. It had been a fun year filled with lots of good experiences...I got to know so many wonderful bloggers without whom this journey of mine would not have been possible. 

From being Raji who was only a mother and a wife I transitioned into being Raji At Vegetarian Tastebuds and truly cherished each and every day of blogging. Each new post brought me close to new friends. I came to know people from different countries and learnt about their food cultures, I tried my hands on various cuisines which I never thought I would try, I stepped towards a healthy life and I started socializing on social network sites like Facebook and Twitter...what more can I ask? 

I sincerely want to thank each and every reader of mine who has taken time out to read my posts and drop in their comments.A big big thank you.  


Sending these cookies to Vardhini's Bake Fest event hosted by Sangeetha at Spicy Treats and to Radhika's Let's Cook #10 event.

Now Coming to the Cookielove..I am co hosting this blog hop along with-

Badger Girl Learns to Cook/ Kimberly Aime/ @BdgerGrl
BigFatBaker/ Erin Meyer/ @BigFatBaker
Bloc de recetas/ Salomé/ @Blocderecetas
Bon a croquer /Valerie/ @Valouth
CafeTerraBlog/ Terra Baltosiewich / @CafeTerraBlog
Cake Duchess/ Lora/ @cakeduchess
Creative Cooking Corner/ Karriann Graf/ @KarriannGraf
Easily Good Eats/ Three-Cookies
Georgiecakes /Georgie Kubarych /@georgiecakes
Hobby And More / Richa/ @betit19
knitstamatic / Deb/ @knitstamatic
Mike's Baking / Mike R./ @mikesbaking
Mis Pensamientos / Junia/ @juniakk
No One Likes Crumbley Cookies / T.R./ @TRCrumbley
Oh Cake / Jessica Hose/ @jesshose
Queen's Notebook /Elizabeth Quirino/ @Mango_Queen
Savoring Every Bite /Linda Geiler/ @Spicegirlfla
Simply Reem / Reem /@simplyreem
Soni's Food for Thought / Soni/ @sonisfood
Teaspoon of Spice /Deanna Segrave-Daly/ @tspbasil
That Skinny Chick Can Bake!!!/ Liz / @Thatskinnychick
The Spicy RD / EA Stewart /@thespicyrd
The Wimpy Vegetarian /Susan Pridmore /@chezsuzanne
Vegan Yack Attack! /Jackie Sobon/ @veganyackattack


December is #cookielove month!
Please join in on the #cookielove fun by linking up any cookie recipe from the month of December 2011. Don't forget to link back to this post, so that your readers know to come stop by the #cookielove event! The twitter hashtag is #cookielove 


Thursday, October 13, 2011

Garlic And Sesame Sticks

Though garlic is known for its medicinal benefits but it's a big no no at my mother's and MIL's place. During festivals and good days it is completely banned in their kitchen. But me and my DH have always been garlic lovers. Till I moved to Dubai I was unaware of garlic bread but once I tasted it there was no going back. I like to add garlic to most of my gravy dishes.

My DH eats raw garlic to control cholesterol and I always stock big mouthwash bottle for him :) 

Long back I saw this recipe in RC's blog and since have made it quite often. These are so addictive that I was left with only few of these to photograph.


Ingredients:

Oats- 1/2 Cup
All Purpose Flour- 1 Cup
Butter- 4tbsps
Sesame Seeds- 1/4 Cup
Garlic Powder- 2 tsp
Chilli Flakes- 1 tsp
Baking Powder- 1/2 tsp
Sugar- 1 tsp
Salt- To taste
Water- To Knead

Procedure:
  • Coarsely grind oats and mix it with all the dry ingredients together in a big bowl.
  • Melt the butter and add it in the flour mix. The flour mix will attain bread crumbs like texture.
  • Add water little by little and knead the flour to form a stiff dough.
  • Cover the dough with a plastic wrap and keep aside for 30 minutes.
  • Meanwhile preheat the oven at 190 degrees C.
  • Take large portion of the dough and roll it ( the dough will not be sticky and will easily roll without use of any flour) in a square shape. 
  • Using a knife cut 1 inch wide and 4-5 inches long strips out of it. Arrange the strips on a greased baking sheet.
  • Repeat the process with remaining dough.
  • Bake for 15 minutes and then turn them over and bake for another 15 minutes. Keep an eye during the last minutes. 
Allow them to cool and while these are hot resist yourself hard to stop from eating these crunchy munchy sticks.


Wednesday, September 28, 2011

Multigrain Chakli/ Murukku


Each day evening at around 6:30 my brain stops working, the reason being my husband.....stop..don't take me wrong...but that's actually a fact. He comes back from office and asks me something to eat along with his cuppa...and I am always short of ideas for light and little bit healthy snacks, which can keep him filled till dinner time. 

I came across this recipe in some magazine..sorry..don't remember the name...neither the exact recipe. But finally I was able to make these delicious chaklis which can be made really easily and in no time.

And these chaklis surely pleased my husband..and I too was tension free till the chakli box was empty.


Ingredients: ( Yields around 15 chaklis)

Oats- 1/4 Cup
Raagi Flour- 1/4 Cup
Wheat Flour- 1/4 Cup
Rice Flour- 1/4 Cup
Urad Daal Flour- 2 tbsp ( Dry roast and grind the daal to a fine powder)
Cumin Seeds- 1 tsp
Green Chillies- 2
Ginger- 1 Inch piece
Salt- to taste
Oil- 1 tbsp+ more for frying

Procedure:
  • Grind chillies and ginger together into a fine paste. Keep aside.
  • Dry roast oats in a pan for 3-4 minutes. Cool and then powder fine in a mixer.
  • Mix all the flours and sieve them together.
  • Add salt, cumin seeds, ginger and chilli paste to the flour.
  • Heat 1 tbsp of oil and add it in the flour.
  • With required water knead the flour into a soft dough.
  • Keep the dough to rest for about 1/2 an hour.
  • Heat oil in a frying pan. 
  • Make the shape of chaklis using the chakli maker and fry them in medium heat in the oil till they are cooked and turn dark golden brown in colour.
  • Remove the chaklis from oil and drain in an absorbent paper.
Store in an airtight container and relish the murukkus. And these will also be perfect to serve the guests in the coming Diwali.


Diwali Special


Thursday, June 23, 2011

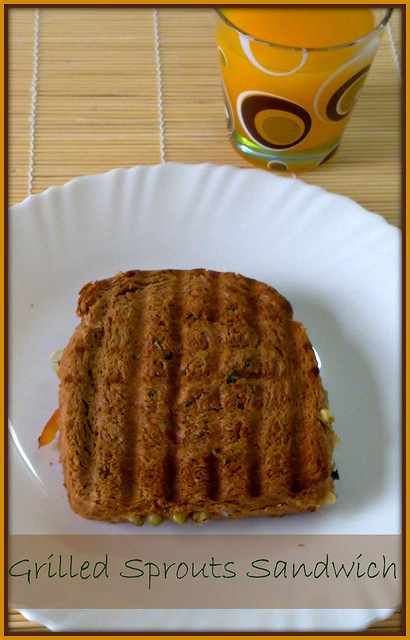
Grilled Sprouts Sandwich

Sprouts feature regularly in my breakfast now a days, I usually eat the sprouts raw but these sandwiches have become my favourite. Even my fussy kiddo likes to have this sandwich, so in the end I am a happy mom as I can disguise the sprouts in her favourite sandwich. I was so glad to see her lunchbox fully polished off :)


Ingredients:

Whole Wheat Large Bread Slices- 4
Potato- 1 medium (boiled and mashed)
Onion- 1 small chopped finely
Moong Sprouts- 1/2 Cup
Tomato- 2 tbsp chopped finely
Salt, Chaat Masala, Black Pepper Powder- To Taste
Cheese Grated- Optional
Ghee or Butter Softened - To Spread ( Optional)


Procedure:

Mix potato, onions, sprouts, salt, chaat masala and black pepper powder together and keep aside. Apply ghee or butter on one side of a bread slice and keep the buttered side facing down on the grill or sandwich maker. Apply a thin layer of green chutney on the unbuttered side, spread the potato and sprout mixture above the chutney layer. Now place the chopped tomatoes on top of the mixture. At this stage grated cheese can be sprinkled on top. Close the sandwich with another bread slice and apply butter on the side of the bread facing up. Grill till done. Serve with tomato ketchup.

   ( The little one anxiously waiting to eat her favourite sandwich)

Sending this sandwich to Srivalli's Sandwich Mela
MLLA#36 brainchild of Susan and hosted at Served With Love
Also sending this to Quick and Easy Recipe Mela at Spicy Tasty


Pictures1-2


Thursday, May 26, 2011

Baked Falafel Sandwich With Home Made Hummus, Tahini And Whole Wheat Oats Pita Bread

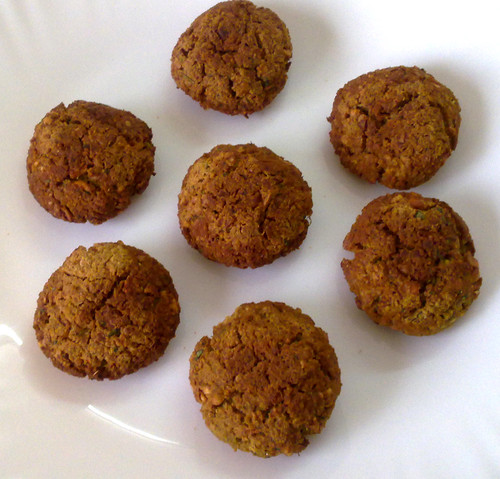
Crispy and crunchy brown croquettes known as Falafels are a world wide sensation. People love to indulge in these scrumptious fried goodies, and I am among one of those who can devour many of these easily without even thinking twice about the amount of extra calories these come loaded with.

When fried these falafels loose all their nutritional qualities and become just fat balls. And since few days I have been eating healthy diet and trying to reduce the consumption of fat, so decided to bake these and made a wholesome meal out of falafels. I served these with whole wheat and oats flour pita bread along with some hummus and tahini sauce.

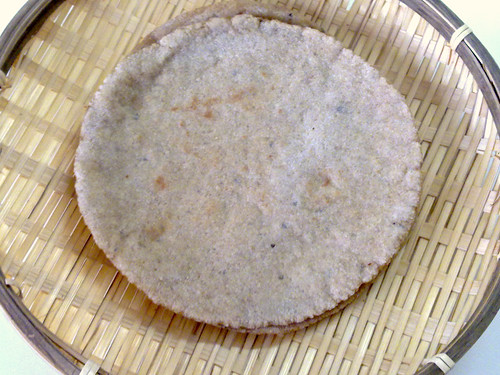
This was my first attempt at making pita pockets at home and to make them healthy I made these combining whole wheat flour and oats along with some Italian seasoning. Though the All purpose flour pitas taste more good, these come without guilt. Initially I baked these pita pockets but I got really mad after seeing papad like pitas...then I remembered seeing these at Priya's space where she makes them like rotis. I too used that technique and voila I had some soft and delicious pita pockets.

Would like to thank my new buddy Meghna who sparked the idea of healthy eating in me.

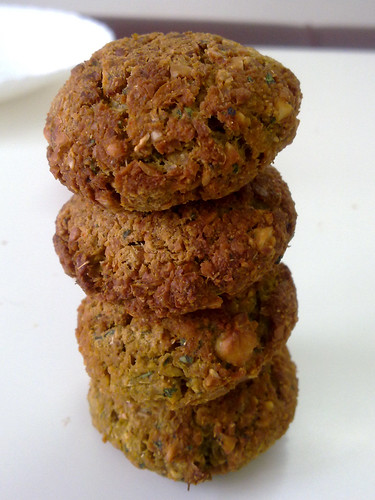
Leaning Tower Of Falafel

Baked Falafel: (Yields around 13)

Ingredients:

Chick Peas Soaked Overnight- 2 Cups ( Soaked Chick Peas)
Garlic- 2 Cloves
Onion- 1 Big
Coriander Leaves- 1/2 Bunch
Bread Crumbs- 2 tbsp
Coriander Powder- 1 tsp
Roasted Cumin Powder- 1 tsp
Red Chilli Powder- 1/2 tsp or more
Salt- To Taste
Lemon Juice- 2 tsp
Baking Powder- 1/4 tsp
Baking Soda- 1/4 tsp
Olive Oil- To Brush the falafels

Procedure:
  • Preheat the oven to 230 degrees C.
  • Rinse the soaked chick peas with ample fresh water and drain. Grind the drained chick peas in a food processor or mixie coarsely without adding any water and empty in a big bowl.
  • Now dry grind the coriander leaves along with onion and garlic and add it in bowl along with chick peas.
  • Add in bread crumbs, salt, coriander powder, cumin powder,red chilli powder, baking powder, baking soda and lemon juice to the chick peas mixture.
  • Mix evenly all the ingredients and shape it in balls and flatten them little like patties.
  • Brush with olive oil on both sides of the balls.
  • Arrange them in the baking tray and bake for around 50 minutes turning the falafels once in between till they brown from outside and become crunchy.


    Tahini:

    Ingredients: 

    White Sesame- 1/4 Cup
    Lemon Juice- 1 to 2 tbsp
    Olive Oil- 1 tsp
    Water As Required
    Salt- To Taste

    Procedure:
    • Dry roast the sesame seeds in a pan or kadhai till they very slightly change their colour and release the aroma. Keep aside to cool.
    • Add the sesame seeds and other ingredients in the mixer jar and grind till a smooth paste is obtained. Adjust the thickness as required by adding more or less water.
      Hummus


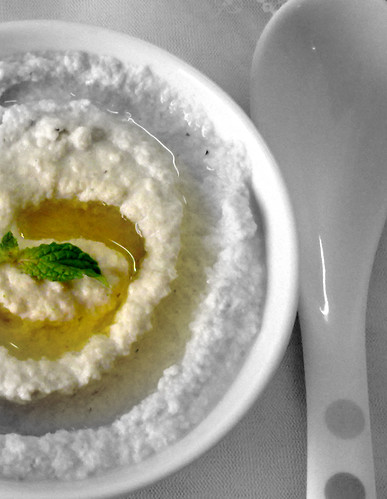
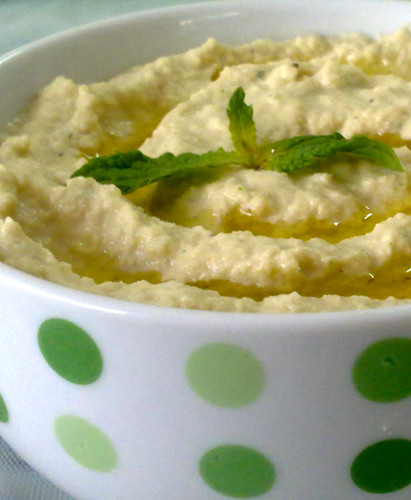
      Hummus:

      Ingredients:

      Chick Peas Soaked Overnight And Pressure Cooked- 1 Cup (Cooked Chick Peas)
      Tahini- 1 tbsp
      Garlic- 2 Cloves
      Lemon Juice- 2 -3 tbsp
      Mint Leaves- 3 or 4
      Salt- To Taste
      Olive Oil- 1 tbsp
      Water

      Procedure:
      Add all the ingredients in the mixer except oil and grind to make a smooth paste. Transfer the ground hummus in a bowl and pour olive oil on top.


      Pita Bread:


      Ingredients:

      Whole Wheat Flour- 1 1/2 Cup
      Ground Oats Flour- 1/2 Cup
      Instant Yeast- 1 1/2 tsp
      Salt- 1/2 tsp
      Sugar- 1/2 tsp
      Italian Seasoning- 1 tsp
      Luke warm Water- Around 200 ml

      Procedure:
      • In a large bowl add whole wheat flour, oats flour along with yeast, salt, sugar and Italian seasoning.
      • Combine everything nicely and start kneading in a dough using the luke warm water.
      • Knead for 5-10 minutes till the dough turns smooth and soft. 
      • Keep the dough in a greased bowl and cover with a greased plastic wrap. Allow the dough to rise for about an hour.
      • After the dough has risen pinch out balls just like when making rotis. Roll the dough using little flour into desired size and cook on heat on a flat skillet or tava allowing the pitas to puff up.


      Assembling The Sandwich:


      Take some shredded and chopped vegetables of your choice and spread it on the pita, then top it up with falafel, some hummus, tahini and wrap it in a foil. Serve immediately else it may become soggy.

      Linking this to Fast Food Not Fat Food Event hosted by Priya of Bon Appetit brain child of Priya of Now Serving.


      Tuesday, April 19, 2011

      Chocolate and Pistachio Slices

      This is a recipe which I had kept since quite some time but it was hiding inside my diary and was long forgotten. Yesterday while I was going through my diary, this recipe paper fell out and my daughter got hold of it. The paper was wrapper of of nestle's condensed milk. When my daughter saw the recipe picture she told mummy you should be making this...this looks so yummy. And as I had all the required ingredients I decided to make this.

      The chocolate and pistachio slices were very good. Crispy in the bottom with gooey middle and crunchy on the top from the pistachios.


      (Recipe Source: Nestle)
      Ingredients:

      For the crust-

      Plain Digestive/Marie biscuits- 200gms crumbled
      Unsalted Butter- 150gms melted

      For the topping-

      Sweetened Condensed Milk- 1 tin(395 gms)
      Butter- 50 gms
      Brown Sugar- 50 gms
      Cooking Chocolate- 200gms (chopped)
      Pistachios- 1/2 cup( chopped)

      Procedure:
      • For the crust combine biscuits and butter then press the dough into a rectangular cake tin and bake in a pre heated oven at 190 degrees C for 10 minutes. Remove from the oven and let cool.
      • Place butter, sugar, condensed milk in a non stick saucepan. Cook with stirring over low heat for 5-6 minutes or until the caramel is light golden colour and thick.
      • Remove from heat and pour the caramel over the crust in the tin. Set aside to cool completely.
      • Melt the chocolate in microwave and stir in the pistachios. Spread the melted chocolate over the caramel topping and allow to set completely in the refrigerator.
      • Cut into desired shapes to serve.

      Sending these to Priya and Aipi's Bookmarked Event- Every Tuesday

      And also to Hearth and Soul Blog Hop co hosted by Kankana

      Hearth and Soul Hop at Sunshine and Smile

      ShareThis

      Post From The Past

      Related Posts Plugin for WordPress, Blogger...